Ruckus with Chilli
On a recent project, we had the benefit of working with Ruckus Wireless access points in building captive portal and secure wireless networks. To illustrate how to use such hardware with CoovaChilli, consider the following example where we are using the [http://www.ruckuswireless.com/products/zoneflex-mid-range/2925 Ruckus ZoneFlex 2925] and a simple Ubuntu PC running the CoovaChilli open-source access controller.
Basic Ubuntu PC Setup
Our Ubuntu PC is running Ubuntu 9.10 and has two Ethernet interfaces, eth0 and eth1. We have eth0 configured to be the WAN (to the Internet) and eth1 for the access point(s). It is not important how eth0 is configured, just as long as you can indeed reach the Internet. In our case, we used DHCP and connected it to our office network. The eth1 interface we configured with the static IP address 10.1.0.1. (For more general information, see the Ubuntu Router help page).
Ruckus Configuration
We begin to configure our Ruckus access point by connecting a PC to one of the LAN Ethernet ports. (Note: The default IP for the Ruckus is 192.168.0.1, which we changed to 10.1.0.2. For detailed instructions, please refer to the [http://www.connect802.com/download/ruckus/ZoneFlex2925_2942_User_Guide.pdf Ruckus User Guide]).
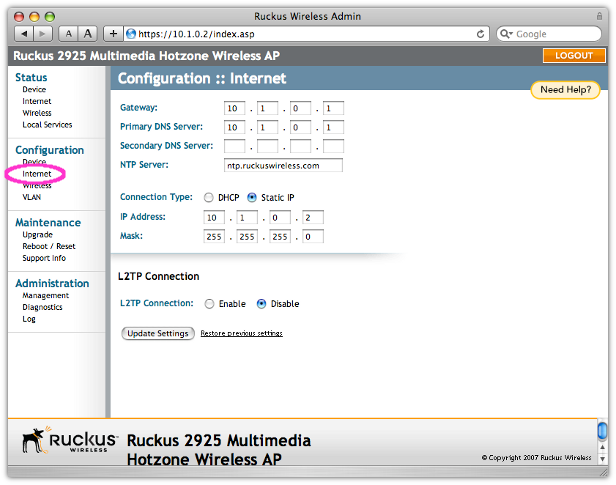
Under the Configuration / Internet menu, we have our access point configured with the static IP address of 10.1.0.2 with a default gateway of 10.1.0.1.
We then connect our Ruckus access point’s WAN port to our Ubuntu PC’s eth1 interface with an Ethernet cable.
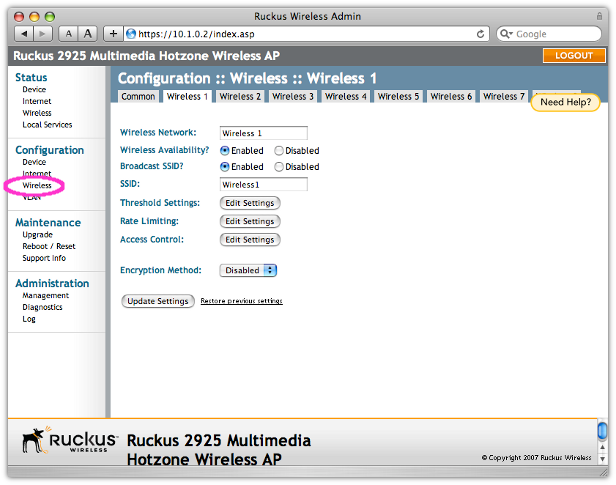
For our purposes we want two wireless networks - one for an open captive portal and another for a 802.1x secure network. Under the Configuration / Wireless menu, we enable both the Wireless 1 and Wireless 2 signals. You can, of course, add more networks with or without wireless security.
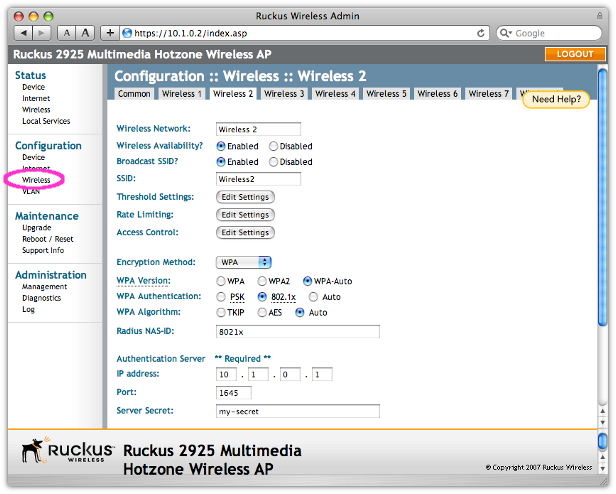
For the open signal we only had to configure the SSID, while for the 802.1x network we also set the required RADIUS settings. The RADIUS settings will point to CoovaChilli, which will proxy the 802.1x authentication and provide RADIUS accounting for the secure wireless sessions.
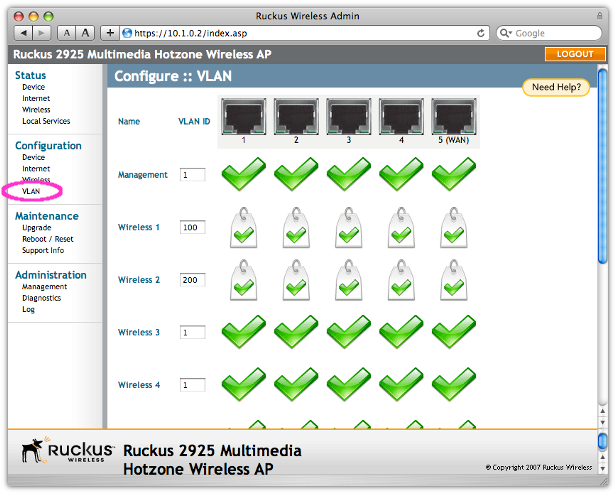
On the Configuration / VLAN screen, we break up our networks by putting the different wireless signals onto different VLANs. In our case, we decided to put the captive portal network on VLAN 100 and our 802.1x network on VLAN 200.
CoovaChilli / Ubuntu Configuration
Our first decision when configuring CoovaChilli is whether to run a single instance to handle all VLANs, or to run a separate instance for each. While CoovaChilli does support 802.1Q VLAN tagging natively, we decided to run a separate instance per VLAN.
Install CoovaChilli from source or binary (TODO: add specific instructions)
# Install vlan support and create interfaces
apt-get install -y vlan
vconfig add eth1 100
vconfig add eth1 200
Using the new multiple instance configuration syntax for CoovaChilli, we have the following configuration files:
/etc/chilli/config:
# This file contains general settings for all instances
HS_RADIUS=radius-hostname
HS_RADIUS2=radius-hostname
HS_RADSECRET=my-radius-secret
HS_UAMSECRET=my-uam-secret
HS_UAMSERVER=my-company.com
HS_UAMFORMAT=http://\$HS_UAMSERVER/hotspot
# ... and so on ...
/etc/chilli/eth1.100/config:
# Settings only for eth1.100 network
HS_NASID=nas-100
HS_NETWORK=10.100.1.0
HS_NETMASK=255.255.255.0
HS_UAMLISTEN=10.100.1.1
HS_UAMPORT=3100
HS_UAMUIPORT=4100
/etc/chilli/eth1.100/chilli.conf:
include /etc/chilli/eth1.100/main.conf
include /etc/chilli/eth1.100/hs.conf
include /etc/chilli/eth1.100/local.conf
ipup    /etc/chilli/up.sh
ipdown  /etc/chilli/down.sh
/etc/chilli/eth1.200/config:
# Settings only for eth1.200 network
HS_NASID=nas-200
HS_NETWORK=10.200.1.0
HS_NETMASK=255.255.255.0
HS_UAMLISTEN=10.200.1.1
HS_UAMPORT=3200
HS_UAMUIPORT=4200
HS_RADPROXY=on
HS_RADPROXY_LISTEN=10.1.0.1
HS_RADPROXY_CLIENT=10.1.0.2
HS_RADPROXY_SECRET=my-secret
HS_RADPROXY_PORT=1645
/etc/chilli/eth1.200/chilli.conf:
include /etc/chilli/eth1.200/main.conf
include /etc/chilli/eth1.200/hs.conf
include /etc/chilli/eth1.200/local.conf
ipup    /etc/chilli/up.sh
ipdown  /etc/chilli/down.sh
Starting chilli:
/etc/init.d/chilli start
While this example isn’t exactly a comprehensive tutorial on setting up Ubuntu, Ruckus APs, and CoovaChilli, it does show one of many possible configurations for using Ruckus access points with the CoovaChilli access controller.